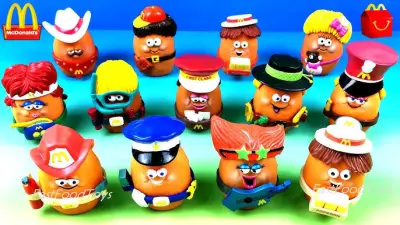
These go down as the best pumpkins our family has produced in the history of EVER. These spray paint minion pumpkins were so easy, so much fun, and made us smile every time we walked up the front steps.
Step by step instructions to make your own Minion Pumpkins included below.
Spray Paint Pumpkin Supplies
Want to make your own Minion pumpkin? Here’s a list of the supplies you’ll need:
- Pumpkins (think of all of the different shapes a minion can be!) Get crazy! The different shapes and sizes make these minions so fun and unique!
- Spray paint primer. Spray paint primer is a quick and easy way to ensure the paint successfully adheres to the pumpkin.
- Spray paint (yellow, blue, purple, black). While we all know that minions are traditionally yellow, feel free to get creative with the rest of the colors. But it is common knowledge that minions prefer blue coveralls.
- Mason jar lids. Let’s face it. Eyeballs make the minion. Keep those mason jar lids handy for epic minion eyes!
- Sharpie markers. Sharpie markers are perfect for minion eyeballs and glasses. A new Sharpie is always the best!
- Black pipe cleaners. Black pipe cleaners are crucial for straggly minion hair. Want a curly-haired minion? They’re so flexible!
- Grommets. Use the grommets for the minions’ adorable coveralls! You need to hold those things up somehow!
- White cardstock. Use a half-circle of cardstock and pin it to the side of the pumpkins before you start with the second color so your minion can have overall armholes. The cardstock is also for the inside of the mason jar lids to create the perfect eyeballs! Use a Sharpie or brown marker to create the pupil.
- Pins. The pins hold the cardstock to the side of the pumpkin to create armholes.
- Painters tape. Painters tape is what you use to spray on your minion’s overalls. Make sure you use the cardstock to help create the illusion of armholes.
- Masking film. Masking film is key for your minions! Wrap your pumpkin in masking film before you spray on your minion’s overalls.
- Sawhorse (not required but really helpful). Have a sawhorse? It will be helpful when crafting! But if you don’t have one, don’t worry; your minion will still turn out!
Best Pumpkin Spray Painting Tips
- Prime your pumpkin! This helps the paint go on extra thick.
- Tape off edges with painter’s tape and masking for clean lines and to prevent mistakes.
- Let them dry all the way! It can be hard with kids, but just be patient, making sure each layer of paint is completely dry before moving on to the next step will keep your colors from smearing and bleeding over.
- Use extra materials! You don’t have to spray paint every detail. Notice with these minions that we used pins to apply extra details with construction paper, jar lids, googly eyes, and pipe cleaners! What else can you use that’s lying around the house? Funny hats, a feather boa, a crown, a Hawaiian lay?
- Pumpkin problems? What happens if you overspray the paint or you paint the wrong spot? Rubbing alcohol will wipe away excess spray paint. You can also wait for the pumpkin to dry and lightly sand the area before you repaint. This approach will also work if your spray paint cracks and you need to repair it!
How to Paint a Minion Pumpkin
Step 1
Set up your spray zone. We used sawhorses in our backyard so that the pumpkins were off the ground and easy to spray completely.
Step 2
Spray your pumpkins with primer and let pumpkins dry (they dry quickly). I made fun of my husband for making us prime the pumpkins. I usually question his over the top detail, but in the end, it always pays off.
Step 3
Spray paint your pumpkins! Lay it on thick and let them dry.
You may want to do multiple coats based on the color. Remember to let each layer dry completely.
Step 4
Wrap your pumpkins in masking film and painters tape to spray on your minion’s overalls. Note the half-circle of cardstock that we pinned to the pumpkins on the sides before applying the 2nd color. This was to provide the illusion of armholes for the overalls. (take a look at the finished pictures to get a better idea of what yours should look like. Note the yellow or purple openings inside of the blue overalls)
Step 5
After your pumpkins are completely dry it’s time to add the finishing touches! How do you paint a minion face?
- Eyes: People are always asking how to make the eyes for minion pumpkins. It’s easy! Use two mason jar lids to form the eyes. Use the inside disc of the lid to trace and cut out the white cardstock insert for the eyes. We used brown markers for the iris with a black pupil. Leave a little white dot in the eyes to add some expression. We used a black magic marker to draw the black band around the goggles to connect everything. To attach the eyes to the pumpkins: We cut down toothpicks to the desired size and super glued them to the back of the mason jar lids so they would stick into the pumpkins.
- Hair: We cut black pipe cleaners in various sizes to create the different hairstyles for our minions. The pipe cleaners stick right into the pumpkins and hold well. Our favorite is the purple minion’s crazy hair!
- Teeth: Cut out small pieces of white card stock to make the teeth that are perfect for your minion. Use sewing pins to hold the teeth in place. Don’t want to hassle with teeth? Just use your magic marker to draw their smile!
- Overalls: Push two rivets (my husband calls them brass grommets) into the corners of your Minion’s overalls. You can grab rivets from the sewing store. Draw the Gru symbol on the outside of the overalls with a black magic marker or sharpie.
Voila! Banana! Your Minion Pumpkins Are Ready to Display
Place your pumpkins on your porch and get out there and steal the moooon!
Creative Minion Pumpkin Painting Ideas
When your original minion turns out so amazing that you find yourself longing for more minion creations, we have some awesome ideas to keep you crafting and the minions coming.
Glow-in-the-dark Minion Pumpkins
Get those minions shining bright into the night! Use glow-in-the-dark spray paint for the ultimate nighttime effect. You will be lighting the way for trick-or-treaters!
Mini Minion Pumpkins
Minions don’t have to be big! Give them some tips and adjustments on how to paint smaller pumpkins to create an entire Minion family. Instead of spray paint, try using paint brushes to hit the smaller areas. Pick the paintbrush size that works for you!
3D Effects
Want to add some extra interest to your pumpkin? Add some accessories to your minion pumpkin to give it some additional flare. A little witch’s hat will sit perfectly on your minion’s head!
Rise of the Minions
Give your minions some height! Stack crates to create a minion display at different levels. You can use wagons, hay bales, bunches of bananas, or whatever strikes your minion fancy!
Best Pumpkin Varieties for Painting
One thing to keep in mind when finding the best pumpkin for painting is to look for a pumpkin with smooth skin. Pumpkins with uneven bumps and lumps are tricky to paint evenly! Hijinks and apprentice pumpkins are both pumpkin varieties for decoration. They are smooth-skinned pumpkin options that work well for craft projects. If you opt for a cotton candy pumpkin or an orange smoothie, these two are also well-known for being excellent baking options. But if you think you’ll bake your pumpkin at some point, make sure to use nontoxic paint!
How to Preserve Your Painted Pumpkin
Wondering how to preserve your painted pumpkin or make your minion pumpkin last longer? We have the answer!
As mentioned below, a pumpkin that has yet to be carved can generally last anywhere between 2-3 months. When you paint a pumpkin, the paint helps to keep the moisture in by acting as a seal, which actually keeps the pumpkin lasting a little longer!
If you want to get even more serious about preserving your pumpkin, after you paint the pumpkin you can use a paint-on or spray-on acrylic sealer to keep the paint from peeling.
Happy Halloween!
If you’ve got a little extra DIY spirit left inside, go ahead and make some Chocolate Dipped Minion cookies to celebrate! (Think Nutter Butter bodies with adorable chocolate coating. Your family will love them!)
Questions About Painting Your Minion Pumpkin? We’ve Got Answers!
Here are a few of the questions we get the most:
How long does it take for spray paint to dry on a pumpkin?
Anywhere between 15 minutes and an hour.
We live in a very dry climate and it’s still pretty warm here in Utah in October. Our pumpkins dried quickly, more on the 15 minutes or less side of things.
Your pumpkin should feel completely dry to the touch.
How long will a painted pumpkin last?
A fresh, uncarved pumpkin typically lasts 2-3 months.
Painted pumpkins actually last a little longer than unpainted pumpkins! The paint acts as a seal and helps keep the moisture in. Pumpkins shrivel as they begin to lose moisture.
We painted our minion pumpkins the first week of October and didn’t take them down until Thanksgiving. We couldn’t bear to part with them. They still looked amazing!
More Questions About Spray Painting Pumpkins?
Leave them in the comments and we’ll be sure to respond!
More Halloween Fun on TodaysMama.com
Using Chalkboard Paint for Pumpkins
7 Pumpkin Cookies for Class Parties
Disney’s Pumpkin Mickey Beignets Recipe
Printable Halloween Memory Game
Halloween Treat Phantom Ghost Printable

Leave a Reply